![]()
Online Rendition
This Quick Help is designed to teach the user how to file a Personal Property Rendition online so they can answer any taxpayer questions as well as how to accept and complete the Online Rendition process in Capture.
1. Access the Citizen Access Portal
2. Click the File Rendition hyperlink

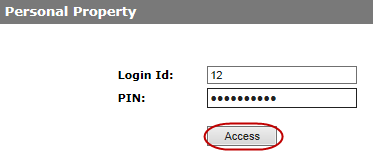
3. Enter Login Id and Password, click Access
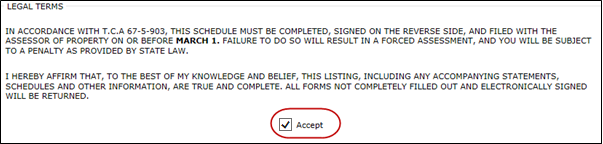
4. Check Accept
5. Update any Business Information, General Information, DBA Information, and Owner Information, click Update
a. Click Clear to clear changes that have not been updated
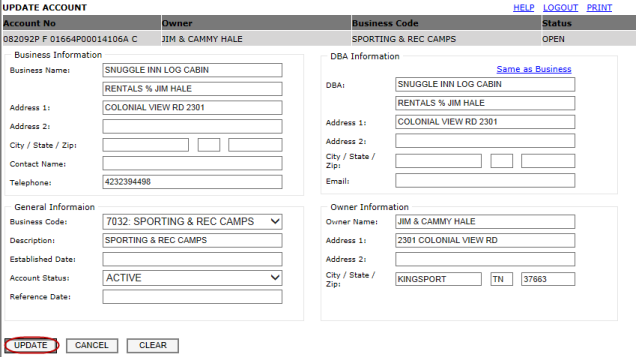
Note: Clicking the Same as Business hyperlink will update the DBA Information to that of the Business Information
6. Click the blue underlined hyperlinked “PART”s to expand explanations
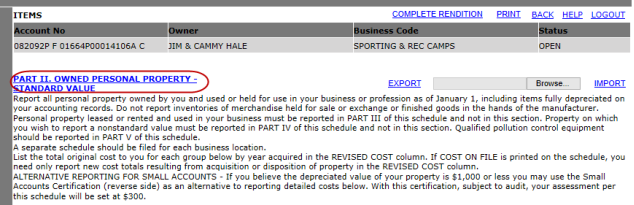
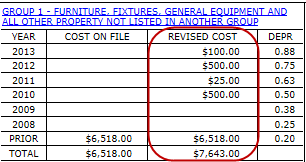
Part II Owned Personal Property – Standard Value
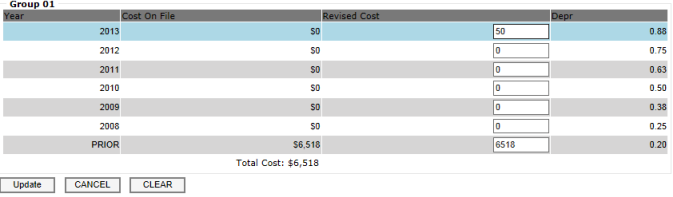
1. Click the Group hyperlinks to update the Revised Cost per year within the group

2. Work in the Group
a. Enter the correct Revised Cost for each year
b. If you have not clicked the update button, you can Clear any revised costs
c. Click Cancel to return to the previous screen
d. Click Update to update that groups cost and to return to the previous screen
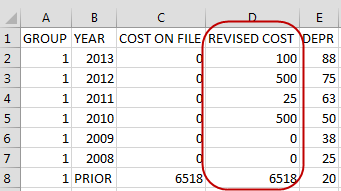
Import Revised Costs
1. Get the proper import format by clicking the Export hyperlink

2. Only update or change the Revised Cost column in the Excel file
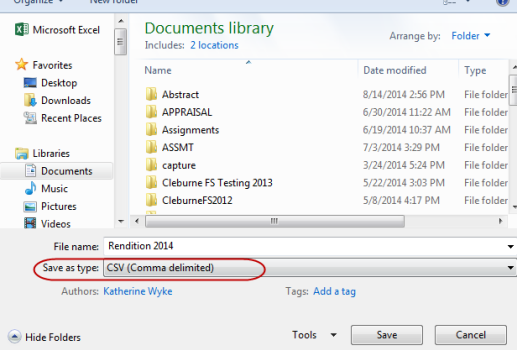
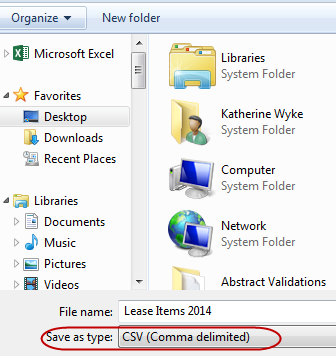
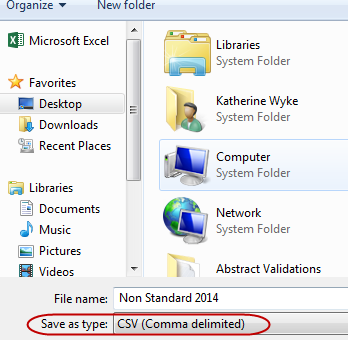
3. Save the excel file using an easily recognizable name
4. The file MUST be saved as a CSV file
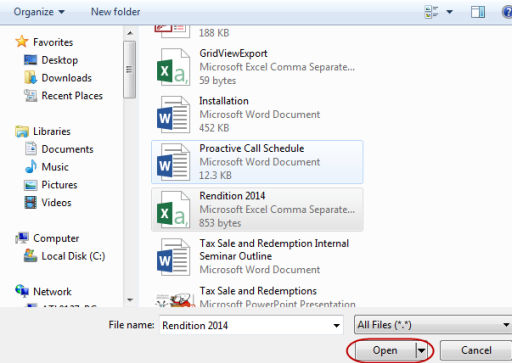
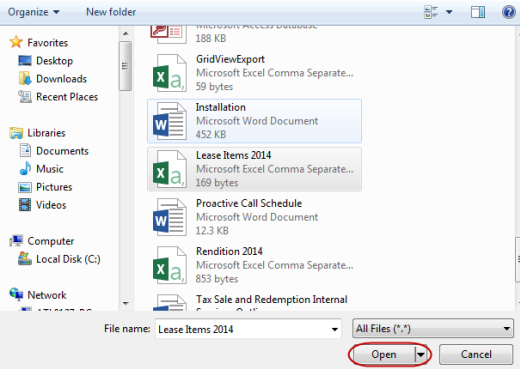
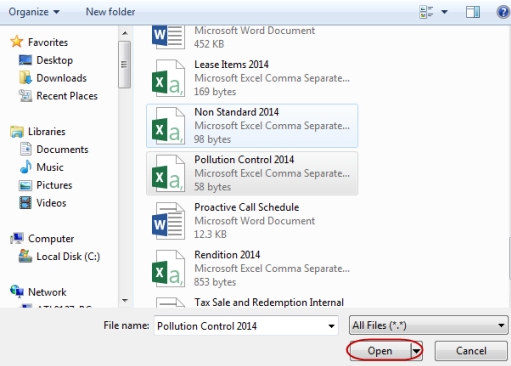
5. Click Browse

6. Search for and Open the file
7. Click Import

8. The Revised Cost columns will be updated to the imported values
Note: The only column that can be updated is the Revised Cost column
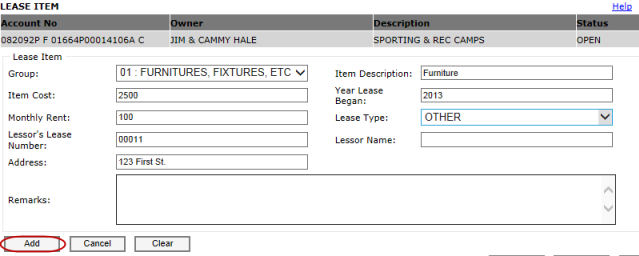
PART III LEASED PERSONAL PROPERTY
1. Click the Edit hyperlink to open the Lease Item dashboard

a. Choose the Group type from the drop-down and fill in any other necessary information
b. If you have not clicked the update button, you can Clear any information you just typed
c. Click Cancel to return to the previous screen
d. Click Update to update that groups cost and to return to the previous screen
e. Click Add to add the lease item to the account
Import Lease information
1. 1. Get the proper import format by clicking the Export hyperlink

2. Update or change necessary information

3. Save the file using an easily recognizable name
4. The file must be saved as a CSV file
5. Click Browse

6. Search for and Open the file
7. Click Import

8. The information will updated to reflect the import

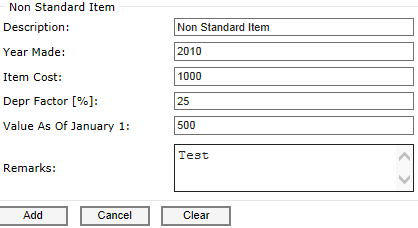
PART IV OWNED PERSONAL PROPERTY – NONSTANDARD VALUE
1. Click the edit hyperlink to open the Non Standard Item dashboard

a. Enter appropriate information
b. If you have not clicked the update button, you can Clear any information you just typed
c. Click Cancel to return to the previous screen
d. Click Add to add the Non Standard Item and return to the previous screen
Import Non Standard Items
1. Get the proper import format by clicking the Export hyperlink

2. Fill in necessary information

3. Save the file using an easily recognizable name
4. The file must be saved as a CSV file
5. Click Browse

6. Open the file
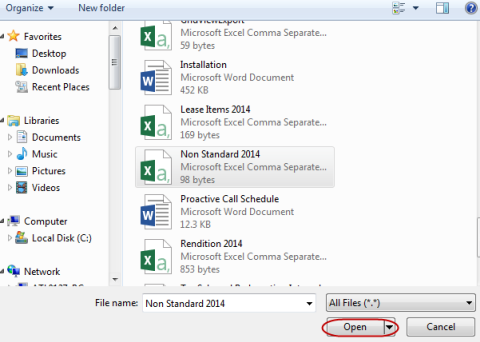
7. Click Import

8. The information will updated to reflect the import

PART V POLLUTION CONTROL
Manually enter Pollution Control Information
1. Click the Edit hyperlink to open the Pollution Control dashboard

a. Enter appropriate information
b. If you have not clicked the update button, you can Clear any information you just typed
c. Click Cancel to return to the previous screen
d. Click Add to add the Pollution Control certificate to the account

Import Pollution Control Items
1. Get the proper import format by clicking the Export hyperlink

2. Fill in necessary information
a. In Certificate Year and Certificate Expires only put the Year

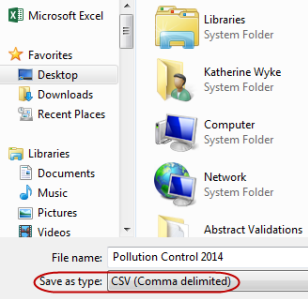
3. Save the file using an easily recognizable name
4. The file must be saved as a CSV file
5. Click Browse

6. Open the file
12. Click Import

13. The information will updated to reflect the import

Note: Only one certificate can be on file at a time
COMPLETING THE RENDITION IN CITIZEN ACCESS
1. Click the Print hyperlink to print the rendition for your records

2. Click the Complete Rendition hyperlink when the rendition is complete

3. Fill in necessary information and click Complete
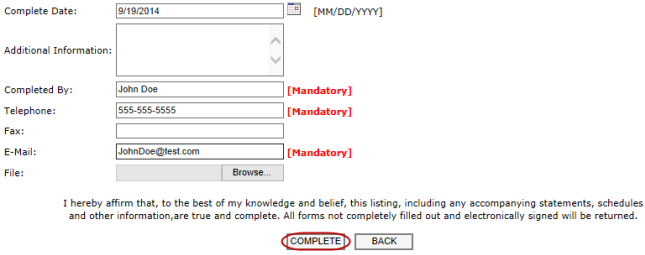
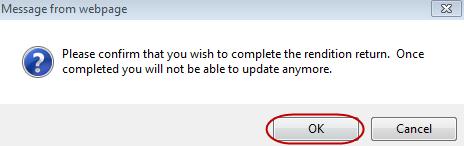
4. Click OK when the pop-up appears if everything is correct – you will not be able to make changes once the rendition has been completed.
COMPLETING THE RENDITION IN CAPTURE
1. Log into Capture
2. Open the PP workspace - refer to Change Workspace Help or Quick Help if needed
3. Hover over the Online Rendition tab and click Unassigned Rendition

4. Enter the correct Record Year and enter a Start Date and End Date, click Go

5. Click Export to export the data to excel

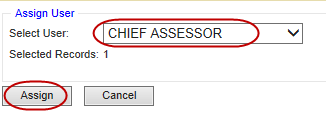
6. Place a check next to the Rendition(s) to be assigned, click Assign

7. Use the drop-down to Select User to be assigned to the rendition, click Assign
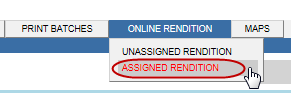
8. Hover over the Online Rendition tab and click Assigned Rendition
9. Search for renditions by:
a. Status:
i. In Progress: Renditions that have not been completed in Capture
ii. Completed: Renditions that have been completed in Capture
iii. All: In Progress and Completed renditions
b. Assigned To: Your Name
c. Record Year: Correct record year
d. Start Date and End Date: Dates that will encompass the completed rendition date to be searched
10. Click Go when all search requirements have been filled

11. Click on the Account No

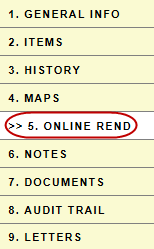
12. Click the Online Rend tab
13. Review the information for accuracy
Note: Click Reset to reopen the online rendition for the customer to make further adjustments

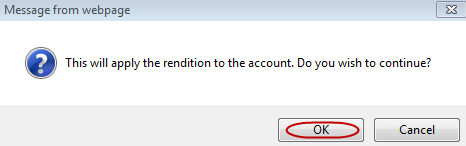
14. Click Apply to apply the rendition to the account

15. Click OK when the pop-up appears
16. The rendition status changes from IN PROGRESS to COMPLETED

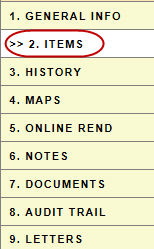
17. Click the Items tab to view the updated information
19. Owner and DBA Information changes can be viewed on the General Info tab
![]()
Confidential | Copyright © 2001-2015 E-Ring, Inc.